
Although bathrooms don’t offer the same welcoming and cozy atmosphere that living rooms or bedrooms provide, it doesn’t imply that they cannot be cozy and comfortable. You can transform your perception of a bathroom area by incorporating rustic bathroom decor.
The charm of rustic bathrooms can be uncovered by the examples presented, which may motivate you to opt for this style in your upcoming bathroom design.
How To Achieve A Rustic Bathroom Décor
Mirror
Vintage mirrors in the shape of rustic ovals are perfect for complementing the modern farmhouse vibe. These mirrors are created using authentic wine barrel tops, which have the original metal bands and natural red wine stain from previous use. They are mounted securely on walls using strong hangers.
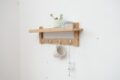
Wall Shelves
The wall shelf is reminiscent of late 19th-century design with its scalloped edges and natural appearance. The combination of heavy and light brown wood tones evokes a rustic ranch house feel.
Lighting
Your bathroom will have a contemporary rustic vibe thanks to the twisted wrought iron and bark-covered handmade centerpiece.
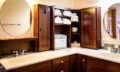
Barnwood Vanity
Crafted entirely from reclaimed barnwood, this bathroom vanity has a charmingly rustic aesthetic. Its curved doors, rustic hinges, and optional linen cabinet make for a classic old Hollywood western vibe. The top counter is sealed and treated to prevent damage from moisture and water.
Farmhouse Sink
Your modern rustic farmhouse bathroom can be enhanced with this hammer copper sink, providing it with the extra touch it needs.
Cabinet
Enhance the look of your bathroom with this rustic black and white cabinet, which is adorned with metal knobs and a white finish. The cabinet also boasts a crown molded top, and a tempered glass-panelled door with cathedral-style wire detail. It includes 3 open shelves, 2 adjustable bottom shelves and a middle drawer.
Wall Décor
With distressed wood and antique key wall decor pieces in brown iron, your bathroom will truly embody the Western look.
The back of the item is made of cocoa brown fir wood with a brushed texture, and features an ornate antique key with a rust finish.
Each piece of both frames is equipped with riveted iron bolts running horizontally along their top and bottom sections.
Faucet
You will be surprised to see how much more rustic your rustic bathroom can look with a brass faucet and a metal pop-up drain.
Accessories – Waste Baskets and Rug
This MOD rug is perfect for safeguarding your farmhouse bathroom and flooring. It not only enhances the aesthetics and functionality but also adds a rustic touch of elegance to your bathroom.
What do you think of this solid tiger maple wastebasket that was crafted by hand and coated with a water-resistant high-gloss finish for durability and protection?
Wide Plank Shiplap Interior Siding
For a wall that combines modern and rustic styles in your farmhouse bathroom, this custom weathered shiplap with a distressed finish made of freshly-sourced solid wood imitating aged wood is the ideal choice.
Rustic Bathroom Decor Ideas
Having a rustic bathroom decor is essential for a contemporary farmhouse look. Nevertheless, you can achieve an Old West bathing station even if you live in a small or non-farmhouse residence.
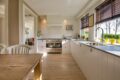
Sliding Barn Door
Installing a barn-style door is considered one of the most favored modern rustic bathroom decor ideas that can be incorporated into a rustic bathroom. The sliding door of this model perfectly embodies a rustic feel. By adding barn doors, a modern rustic farmhouse style can be enhanced with a delightful appearance. Besides, the white marble countertops complement the rustic design. ( peacedesign ).
Stone And Natural Materials
Consider using stone tiles to enhance the appearance of your bathroom and complement the barn door. Not only do they create a significant impact on the space, but they are excellent for creating a rustic decor as well. If you are planning a bathroom remodel project, this option is worth exploring. (chrismetzinteriors)
Using a stone wall instead of tiles can enhance the rustic charm of a bathroom. The addition of stone walls can create a cozy and inviting atmosphere in any room. (kuohphotography).
Live Edge
Another great choice is wood. To achieve a rustic feel in the bathroom, try incorporating live edge wood or reclaimed boards to showcase their inherent charm. Install a barn door to enhance the overall aesthetic.
Wood Accent Wall
Create a rustic backdrop for the vanity and mirrors in the bathroom by installing wooden boards on one of the walls. Avoid using wood in the shower area as it is susceptible to moisture damage.
Pair Natural Elements
One may incorporate both stone and wood in their bathroom since they are both excellent materials. If one admires both, they can utilize stone for the walls and wood for the furniture.
Accent Lighting
The pendant lamps shine a light that emphasizes the texture and design of the walls, which are made of stone, drawing attention to them as the main visual feature in the bathroom. The color scheme is simple and complements the overall aesthetic.
Style And Charm
The appeal of this bathroom with a rustic aesthetic is derived from showcasing the natural allure of the woodwork. Additionally, the attractiveness of the design comes from the intricacies such as trendy faucets, the sink’s form, and the distinctiveness in the furnishings. {source: wellingconstruction}
Log Cabin Vibe
The design of this bathroom aims to evoke the cozy feeling of log cabins commonly found in mountainous areas. Despite the rustic quality of the log wall, the overall aesthetic incorporates modern and minimalist elements for a striking juxtaposition.
Introduce Rustic Accessories
If you aim to achieve a rustic look for your bathroom, selecting appropriate materials is crucial but it’s only the initial part of the process. Adding complementary features like a woven rug, a candle chandelier, or a vintage vanity topped with marble will enhance the rustic appearance of the space.
Mix Styles
Achieving a harmonious blend of both rustic and modern elements is no easy feat in designing a contemporary bathroom. Nevertheless, this stylish example of a bathroom can serve as motivation for your own project. Why not try combining the vintage elegance of shabby chic with the ruggedly charming aesthetic of a rustic modern farmhouse?
Bathroom Fireplace
A fireplace can create a warm and cozy ambiance in any kind of space regardless of its purpose. While it’s not common to have a fireplace in a bathroom, it can still greatly enhance the room’s rustic aesthetic. Additionally, the understated marble countertops blend in naturally.
Natural Warm Bath
Even subtle hints of a rustic aesthetic can be incorporated, such as using reclaimed wood planks to cover a bathroom wall. To complete the look, pair a chic mirror and marble countertop with the wall.
Open Space Design
Designing a rustic bathroom becomes simpler when it’s integrated with the master bedroom, as it enables you to carry on with the bedroom’s design elements into the bathroom by utilizing the same materials, hues and finishes. Additionally, you may incorporate stone sinks, which preserve the rustic theme.
BONUS: How to Build a Double Wall Mounted DIY Coat Rack
Do you need a straightforward method to hang up your coats, jackets, and bookbags? These double hooks mounted on the wall offer an ideal answer that you can tailor to fit your area.
Why build two sets of wall hooks?
As children grow, their need for space increases. Therefore, we opted to install hooks that could be easily reached by everyone. This way, no one has an excuse for not putting their belongings away.
Recommended Supplies
- 1” x 8” x 8’ Pine or Poplar Board Cut to Size-We were able to get two coat rack boards out of one size
- Circular saw (if cutting yourself)
- Hooks (My husband loved the look of these simple hooks from Home Depot)
- Speed Square
- 4′ Level
- Tape Measurer
- Cordless Drill
- Stain color of your choice
- 220 Grit Sandpaper
- Old T-shirt cut up
- Polyurethane in the finish of your choice
- 2” brush (This brush is a great economical brush)
- Sawhorses
- Wax paper
- Old 2 x 4s to rest the wood on while staining
- Mineral Spirits to clean brush
- Latex Gloves
Other Hooks to Purchase
Depending on the finishes in the surrounding areas, there are several hooks that I would have taken into account.
- Rustic Matte Black Hooks for a more Farmhouse look. You honestly won’t believe the price on this ten-pack.
- Decorative Brass Hooks from Target for a more sophisticated look.
Before You Begin
Determine Design
Decide on the desired dimensions of the coat rack.
Our Coat Rack
- Is 36”s long x 7.75”s wide x 7/8”s thick.
- Hooks are 8”s apart from each other for reference.
- Determine the type of wood you want to use.
Tip For Picking Wood
Pine would be the most economical choice for painting the coat rack.
If you plan on sanding, staining, and coating the wood, it’s recommended to use a higher quality hardwood (which is pricier). However, we opted for poplar wood as we intended to stain it in our preferred color.
How To Build Wall Mounted Hooks
Step 1: Cut Two Boards To Size
Employ a circular saw to trim the wood to the desired dimensions.
Step 2: Smooth Edges
Sandpaper can be used to eliminate any rough areas.
Step 3: Apply Stain To Wood
Choose a color for the stain. The stain color we went with was this one.
Hint: The hue will deepen as time elapses after staining.
Tips For Staining Wood
- Place your wood on the sawhorses, then a 2×4, then wax paper over the 2x4s.
- Wear latex gloves.
- Open the stain and stir it (do not shake). Make sure you read the instructions on the stain.
- Make sure you are doing this in a well-ventilated area as the stain has a mild odor.
- Use a cut-up old tee-shirt or old towel to apply the stain.
Step 4: Wipe Stain
Using a clean cloth, eliminate the stain after approximately 10 minutes.
Step 5: Let Wood Fully Dry
Allow the stain to dry for a period of 2 days.
Step 6: Add Poly
Choose a type of polyurethane to utilize. We opted for a satin finish.
You may want to consider Semi-gloss /gloss finishes if you are not satisfied with the satin finish. However, if you prefer a more natural coat rack, the satin finish would be the best choice.
Tips For Applying Polyurethane
- Wear latex gloves.
- Use a 2” wide brush and brush on the poly.
- Light coats are better than thick coats
- Make sure you brush the edges of the board after you do the top
- Let dry for 24 hours
Step 7: Sand In Between Coats Of Poly
After allowing the initial layer to dry, smooth and refine it with 220 grit sandpaper.
- This will remove air bubbles etc.
- Don’t worry that the first coat will look white and powdery when done.
- After sanding take a damp cloth, with water, and wipe down the board.
Step 8: Apply A Second Coat Of Poly
Using a dry cloth, wipe off any moisture and then proceed to apply a second layer of poly.
Optional Step
You can carry out this procedure an unlimited number of times. The finish becomes increasingly resistant with additional layers of poly. Our personal experience has been limited to a maximum of three (3) coats, with two (2) being the norm.
Step 9: Hang Boards
Take measurements and locate the center of your board. We installed one hook initially and then attached the remaining ones after mounting the board.
To begin, it is necessary to suspend the board. Utilize a stud finder to identify the appropriate location for hanging the board.
Drill Pilot Holes
Ensure that the diameter of the pilot holes drilled in the board will be able to support the 4” screw.
Make It Level
Raise the board and place the level on it, verifying that the bubble is centered.
Screw It Into Studs
While one person pushes the board into the wall, the other should fasten it to the studs using screws.
Step 10: Add Hooks (Hopefully Over Screws)
After mounting the board, you can indicate where to place the hooks. As mentioned earlier, set the hooks above the screw holes to conceal them and produce a polished appearance.
Step 11: Attach All Hooks
Keep repeating the process until all your hooks have been attached.
Special Notes
- If you only plan on hanging coats, then you could use drywall anchors.
- If you plan on hanging backpacks, then you need to have your coat racks hung into the studs.
- We used 4”s long screws due to the thickness of the board + drywall being 1 – 5/8” thick and wanting enough “meat” into the studs.
Step 12: Hang Second Board and Hooks
To ensure evenness, utilize a 4-foot level to check that both your top and bottom wall hooks are at the same height.
To mount your DIY coat rack, simply follow the steps mentioned above.